1.24.2022

Basic Moroccan Paprika fish

 This Fish is flavorful, healthy, and couldn’t be easier to make. Slowly steamed with aromatic herbs and spices, then drizzled in a rich red paprika sauce, it’s an impressive dish that requires very little effort. Whether you’re cooking an easy weeknight dinner or a special holiday meal, you can’t go wrong with this recipe.


  • 4 fillets white fish, 8 ounces each (best if you use a firm, dense fish like halibut, sea bass or snapper)
  • 1 bunch fresh cilantro, cut into large pieces (you can substitute fresh parsley or basil if you prefer)
  • 1 red bell pepper, seeded and cut into long thin strips
  • 5 large garlic cloves, coarsely chopped
  • 3 large dried red chili peppers
  • 1/4 tsp turmeric
  • 1 1/2 cups water
  • 1/3 cup extra virgin olive oil
  • 1 tbsp paprika (heaping)
  • Salt and pepper to taste
    (Optional ingredients: Lemon, Olives, capers, shrimp etc)

 For this recipe, you will need a sauté pan, it’s like a wide, deep skillet with higher sides. Before you start cooking, reserve a few pieces of the cilantro for garnish.


1. Place cilantro, bell pepper slices, garlic and chili peppers in the bottom of the pan to create a “bed” for the fish.
Place fish fillets on top of the other ingredients. Season fillets generously with salt and pepper, then sprinkle turmeric evenly across fillets.


  1. Place cilantro, bell pepper slices, garlic and chili peppers in the bottom of the pan to create a “bed” for the fish.
  2. Place fish fillets on top of the other ingredients. Season fillets generously with salt and pepper, then sprinkle turmeric evenly across fillets.
 2. Add 1 ½ cups of water to the pan. Cover pan, turn flame on high, and bring to a boil. As soon as the water boils, reduce heat to medium and uncover the pan. Mixture should be simmering lightly at this point. Allow mixture to simmer uncovered for 10-15 minutes, basting fillets periodically, until the water reduces by half and turns yellow.


3. In a small bowl, mix together olive oil and paprika with a fork. Pour red oil mixture over the fish fillets, coating them evenly. Let the fish simmer uncovered for 20 minutes more, basting frequently. Fish is done when liquid is reduced to about a quarter of what it was originally, and the fish has turned a rich red color.


4. Serve fish and bell peppers together with the grain and/or vegetable of your choice. Garnish with fresh cilantro leaves.


1.23.2022

Cholent - a Jewish Sabbath-day dish of slow-baked meat and vegetables.

 Since Biblical times the Jewish people have scattered and settled all over the globe, adapting their foods to suit the regions where they’ve settled. Over the centuries countless regional ethnic dishes have been made kosher to fit the Jewish religious standards for pure eating. This means that “Jewish food” is really world cuisine; there are very few dishes that are uniquely Jewish. Bagels? A Polish baked bread originally created for Lent and later embraced by the Jews. Gefilte fish? A German dish adopted by Yiddish cooks. But cholent– well, cholent is one of the few foods that is totally and completely Jewish.


Cholent is uniquely Jewish. It was created because Jewish law does not permit cooking on Shabbat. To adhere to this God prohibition, Jewish cooks began to create meat and bean stews in heavy pots that would slowly simmer inside a low-heat oven overnight. They would prepare the stew on Friday before sundown, cook it partially, and place it into the oven to continue cooking throughout the night. That way, there would be no need to kindle a fire or light a stove during the hours of Shabbat; they would simple remove the stew from the oven at mealtime and it would be fully cooked and ready to serve.

  • 2 lbs (1kg) large red potatoes, peeled and halved 
  • 2 whole onions, chopped
  • 2 lbs (1Kg) beef stew meat or brisket, cut into chunks 
  • 2 marrow bones
  • 1 cup dried beans - lima, pinto, chickpeas, red beans (not kidney), or a mixture
  • 1/2 cup pearl barley or coarse-grain kasha 
  • 3 whole garlic cloves
  • 6 eggs 
  • 1/2 tsp black pepper (if spice sensitive use 1/4 tsp)
  • 1 quart chicken broth
  • 1 tbsp salt
  • 1 1/2 tsp paprika
  • 1 1/2 tsp turmeric
  • 1 tsp cumin
  • 1/4 tsp cayenne (if spice sensitive use just a pinch)
  • Water (varies)

1. In a large slow cooker (the larger the better!), place the potatoes in a single layer on the bottom of the cooking vessel.


2. Sprinkle the onions over the potatoes.


3. Place the beef in a single layer on top of the onions and potatoes. Place the two marrow bones in the meat. 


4. Rinse the beans clean, checking for any stones or impurities. If using barley or kasha, do the same with the grains. Sprinkle the beans (raw or pre-soaked) and optional grains over the top of the meat. Place the three whole garlic cloves into the meat, evenly spaced. Sprinkle the whole mixture with the black pepper. Add the eggs, rinse them well and then tuck them into the meat. 


5. In a 4-cup container, whisk together the low sodium chicken broth, kosher salt, paprika, turmeric, cumin and cayenne.


6. Pour the liquid over the cholent. Add additional water until all of the beans and pieces of meat are covered. For us, it's usually another 1-2 cups of water in our slow cooker-- it will vary; I usually add a bit more liquid if using grains, because they will soak it up.


7. Cover the slow cooker. Cook on low heat for 16 hours. Check occasionally as it's cooking; add additional water and stir a bit if it's looking too dry. Most cookers will auto-switch to warm when the cooking is complete. If yours doesn’t, set it to warm until ready to serve.


8. It will look a bit strange when it's done cooking! Don't worry, just dig in and you'll see that it's perfectly cooked below the surface. Peel the eggs before serving the cholent.


To cook this recipe in the oven, layer the ingredients in a large heavy 7-8 quart Dutch oven. Make sure you have enough liquid to just cover all ingredients. Cover with lid and cook cholent at 200 degrees F for 12-16 hours.


Shakshuka

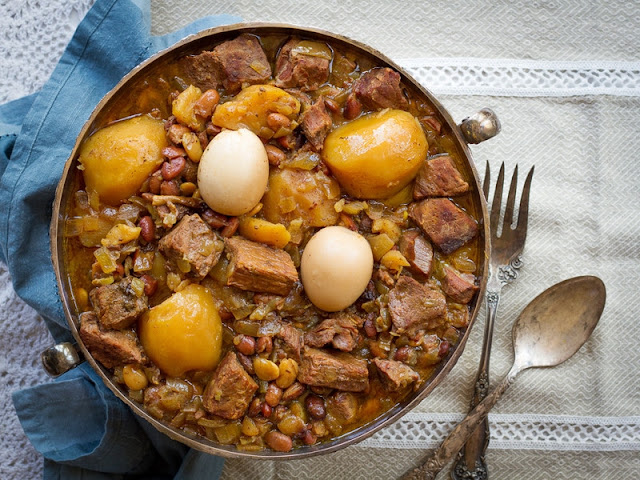
If you are not familiar with shakshuka, I am excited to introduce the concept to you! The word shakshuka, rooted in Arabic means shaken together or mixed, which is the perfect way to describe this dynamic mixture of flavors and endless options for combinations. You’ll find variations of eggs shakshuka all over the Middle East in Palestine, Israel, Egypt and many other places. This easy and healthy egg dish is vegetarian, gluten free, and incredibly delicious. 


The concept is very simple. A dish of eggs soft cooked atop a bed of thick reduced spicy tomato sauce with peppers. In the maghreb, this chunky sauce is known as matbucha. Similar preparations are made throughout the world, including a popular Italian dish known as “eggs in purgatory.” Shakshuka is somewhat different than the Italian dish; it’s generally spicier, and has the addition of peppers.

Shakshuka is also very popular in Israel, where it is often eaten for breakfast. 

In Tel Aviv, the most famous place to eat shakshuka is a restaurant known as Dr. Shakshuka.
The charm of Dr. Shakshuka is evident from the moment you enter. The restaurant is housed in an aging building in the old port city of Jaffa. It’s buzzing all day long with local patrons as well as tourists, everybody eager to taste the “Tripolitanian”-style cooking. The owner Bino Gabso was born to a Libyan family that immigrated to Israel in 1949. 

If you’re looking for variations on flavor, different ingredients can be added to the tomato base—jalapeños, green chilies, parsley, red pepper flakes, smoked paprika, additional vegetables or anything else that sounds tasty to you. I’ve even made it with a spinach/tomato base that turned out great.  Use your imagination!

Shaksuka

1 tablespoon olive oil
1/2 onion, peeled and diced
1 clove garlic, minced
1 red bell pepper, seeded and chopped
4 cups ripe diced tomatoes, or 2 cans (14 oz. each) diced tomatoes
2 tablespoon tomato paste
1 teaspoon mild chili powder
1 teaspoon ground cumin
1 teaspoon paprika
Pinch of cayenne pepper, or more to taste (careful, it's spicy!)
Pinch of sugar (optional, to taste - omit for low carb)
kosher salt and pepper, to taste
6 large eggs
1/2 tablespoon fresh chopped parsley or cilantro (optional, for garnish)


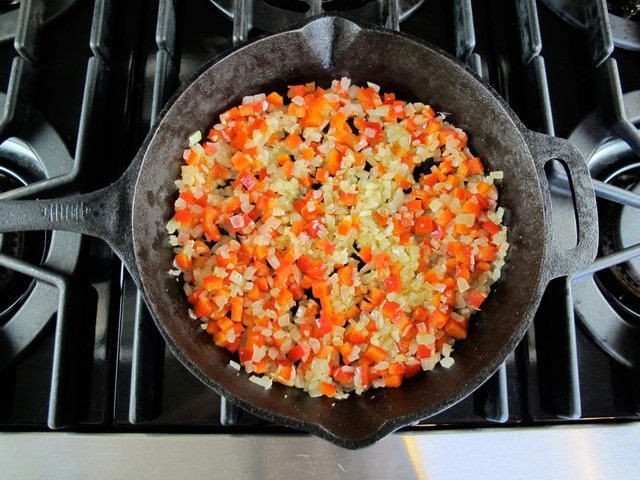
1. Heat a deep, large skillet or sauté pan on medium. Slowly warm olive oil in the pan. Add chopped onion, sauté for a few minutes until the onion begins to soften. Add garlic and continue to sauté till mixture is fragrant.   


2. Add the diced bell pepper, sauté for 5-7 minutes over medium until softened.


3. Add tomatoes and tomato paste to pan, stir until blended. Add spices and sugar, stir, and allow mixture to simmer over medium heat for 5-7 minutes until it starts to reduce. 


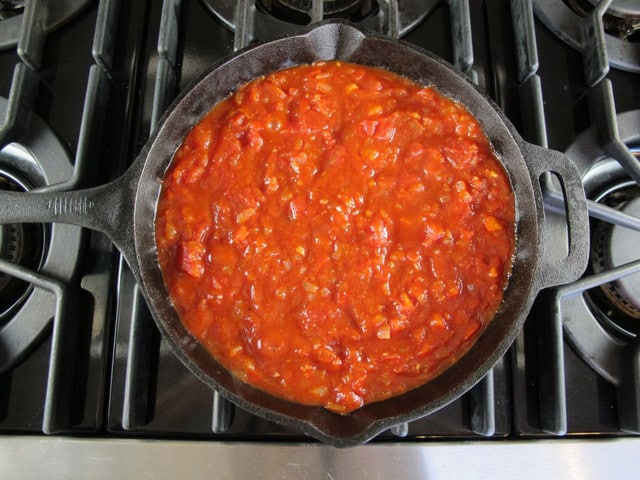
4. At this point, you can taste the mixture and spice it according to your preferences. Add salt and pepper to taste, more sugar for a sweeter sauce, or more cayenne pepper for a spicier shakshuka (be careful with the cayenne... it is extremely spicy!

5. Crack the eggs, one at a time, directly over the tomato mixture, making sure to space them evenly over the sauce. I usually place 5 eggs around the outer edge and 1 in the center. The eggs will cook "over easy" style on top of the tomato sauce.


6. Cover the pan with a lid. Allow mixture to simmer for 10-15 minutes, or until the eggs are cooked and the sauce has slightly reduced. Keep an eye on the skillet to make sure that the sauce doesn't reduce too much, which can lead to burning.


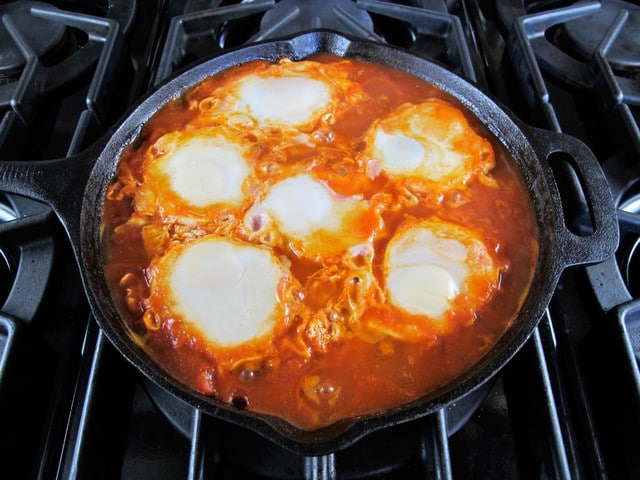
7. Some people prefer their shakshuka with more runny yolks. If this is your preference, let the sauce reduce for a few minutes before cracking the eggs on top-- then, cover the pan and cook the eggs to taste, making sure the egg whites are set before serving. Garnish with the chopped parsley or cilantro, if desired. A sprinkle of feta cheese on top is also nice!


Passover Eastern European Jewish Brisket


Jews living in Eastern Europe rarely had the money to buy better cuts of meat. They learned to cook with cheaper cuts, like brisket, often overlooked for its toughness. Cooking the brisket low and slow breaks it down, resulting in a tender piece of meat.

This Jewish tradition continues today, and brisket is often served for special holidays and occasions. On Shabbat, it is added to a pot with vegetables and potatoes to make a slow-cooked meaty stew known as cholent. At Rosh Hashanah, it is added to root vegetables with sweet dried fruits and slow cooked into tzimmes. This is the basic recipe, from here you can personalize according to your taste.

  • 5-7 lbs (3kg) brisket, first or second cut (do not trim fat - especially if it's grass fed)
  • 1/4 cup extra virgin olive oil, divided
  • 2 large brown onions, peeled and sliced
  • 1 lb (500g) carrots, peeled and sliced
  • 1 lb (500g) celery, peeled and sliced
  • 28 oz (700g) tomatoes - whole, diced, or crushed (1 large can)
  • 10 peeled whole garlic cloves
  • 1/2 cup brown sugar
  • 1/4 cup apple cider vinegar 
  • 2 cups beef or chicken broth, divided
  • Salt and pepper
    (Optional Ingredients: Raisins, dried fruits, potatoes, turnips, 1 tbsp honey, 1 chopped apple and cinnamon.

    1. Preheat oven to 300 degrees F. Rinse the brisket and pat dry. Rub both sides of the meat with black pepper and salt.


    2. Heat a large skillet over a medium flame on the stovetop. Drizzle 2 tbsp of olive oil into the pan. Brown the brisket on both sides—it will take 4-5 minutes per side. A large brisket may overlap the edges of the skillet; you can brown it in stages, letting half the brisket overlap the edge, then adjusting it to brown the other half.

3. While brisket is browning, pour canned tomatoes, garlic, brown sugar, apple cider vinegar, and 1 ½ cups broth into a blender or food processor. Add 2 tsp of salt and ¼ tsp of black pepper. Pulse till garlic is chopped small and all ingredients are combined.


4. Remove the browned brisket from the skillet. Drizzle 2 tbsp more olive oil in the pan and add the sliced onions. Saute them over medium high for a few minutes until they begin to soften and shrink in size.


5. Add the carrot and celery slices. Sauté for another 5-6 minutes until the onions are soft and browning and the vegetables are fragrant.


6. Pour the vegetables out of the skillet and onto a plate, reserve. Add 1/2 cup beef stock or chicken stock into the skillet and let it heat up. Use a spatula to gently scrape up any brown bits and pan juices that are clinging to the skillet. Turn off heat.


7. Pour half of the tomato mixture into a large roasting pan.


8. Place brisket on top of the tomato sauce, fat cap facing up.


9. Pour the sauteed vegetables across the top of the brisket, along with the broth and brown bits.


10. Pour the remaining tomato sauce over the top of the vegetables and brisket.


11. Cover the roasting pan tightly with a layer of parchment paper followed by a layer of foil. The parchment forms a protective layer between the meat and sauce (which is acidic) and the foil.


12. Place brisket in the oven. Let it roast undisturbed for 5 to 7 hours. It will take about 1 hour per pound of meat (leaner cuts of meat like grass fed may take longer—test for doneness). Brisket is ready when it flakes tenderly when pierced with a fork. You can let it cook even longer for a soft, shredded texture if that’s what you prefer. When fully cooked, the brisket will have shrunk in size. I recommend making this brisket ahead; allowing it to sit in the refrigerator for 1-2 nights will improve the flavor. If you would like to do this, skip ahead to where it says “Make Ahead Directions.” If you are not making ahead, continue reading.


13. Remove brisket from the pan and let it rest on the cutting board fat-side up for 20-30 minutes. Meanwhile, pour the sauce and vegetables from the roasting pan into a smaller saucepan. Skim fat from the surface of the cooking sauce, then reheat the sauce till hot (not boiling).


14. Cut fat cap off the brisket, then cut the brisket in thin slices against the grain. Serve topped with hot tomato sauce and softened veggies.


Make Ahead Directions: 

15. Open the foil to vent and let the brisket slowly return to room temperature. Switch the brisket and sauce to a ceramic or glass dish (metal from the roasting pan can react with the acid in the sauce, which can cause an off taste if left to sit). Cover with plastic wrap and place in the refrigerator. Let the brisket chill overnight, or up to two days. You can also freeze the brisket if you prefer.
1-2 hours before serving, remove the brisket from the refrigerator and preheat your oven to 350 degrees F. The fat in the sauce will have risen to the top, turned white, and solidified. Use a spoon to scoop the fat bits out of the sauce and discard.


16. Take the brisket out of the dish and brush any excess sauce back into the dish. Place brisket on a cutting board, fat-side up. Slice the meat cold—first cut the fat cap off the brisket, then cut the brisket in thin slices against the grain.

17. Return the sliced meat to the dish and spoon sauce over it, making sure to spoon a little sauce between each slice. Cover the dish with a layer of parchment paper, then with foil, and place it in the oven.


18. Let the brisket roast for 45-60 minutes until heated through. You can cook the brisket even longer to let it become more tender, if you wish. Serve with hot sauce and softened veggies. If you prefer, you can use a slow cooker to reheat. Set the slow cooker to high heat and cook until heated through, about 1 hour.


1.19.2022

Onion and garlic beef tenderloin


  • 1 lb beef tenderloin
  • 3 onions (sliced like rings)
  • 3 garlic cloves, chopped 
  • 1/2 cup red wine
  • 2 tbsp Butter
  • Fresh Parsley
  • Salt and pepper to taste

1. Cut the tenderloin in bite pieces. 

2. Season with salt, and pepper.

3. Heat a large, heavy-bottomed frying pan over high heat. Place the meat with 1 tbsp butter in the pan (single layer) and let cook undisturbed for about 2-4 minutes. Flip the meat using tongs or a spatula and cook for additional 2-4 minutes. Transfer the meat to a plate.

4. In the same pan where meat were just cooked, heat 1 tablespoon of butter over medium heat and combine the onion rings and garlic. Cook for about 5 minutes (season with a pinch of salt after cooking for an initial 2-3 minutes), stirring constantly. Place meat on top of the onions and let cook undisturbed on medium heat for about 1 minute drizzleling the wine. This helps the onions to absorb the rich meat flavor. Mix all together and serve.


Basic white rice (Brazilian Style)


  •  - 1/4 cup vegetable oil or olive oil
  •  - 1 cup white (long grain) rice (basmati or jasmine for example), washed
  •  - 2 cups water
  •  - 1 medium onion, finely chopped
     -  2 bay leafs
  •  - 3 cloves of garlic, minced
  •  - Pinch of salt

  • 1. Put the water to boil in a tea kettle.

  • 2. In a large pot, heat the vegetable oil over medium high heat.

  • 3. Add the onion and garlic and sauté until translucent. Then add the bayleaf.

  • 4. Add the raw washed rice and cook, stirring occasionally so it doesn't burn, until it starts forming clumps.

  • 5. Add the boiling water and the salt, cover and lower the heat to the lowest setting.

  • 6. Cook for 20 minutes or until there's no more water in the bottom. (You will see some holes forming in the surface and you won't hear any more water!)

  • 7. Turn the heat off and lift the cover slightly.
  •  Let the rice sit untouched for 5 more minutes.
  • Fluff the rice with a fork and serve.

Black beans Brazilian Style


  • 1 lbs (500g) Black Beans (If using canned beans 1 1/2 lbs (750g)
  • 7 large cloves garlic, sliced
  • 1 bouillon cube of beef
  • 2 bay leaf
  • 360g smoked bacon lardons
  • 12 oz (340g) smoked kielbasa sausage (optional)
  • Cilantro or parsley to taste

    (READ NOTES BEFORE STARTING IT)

1 - Wash the beans and let it soak on a bowl full of water for at least five hours. 

2 - Then put the beans, bayleaf, bouillon and sliced sausages (if using it) in a pressure cooker with a layer of water to cover them and an extra 3/4 inch of water above the layer of beans. You can use an Instant Pot for this. Cook for 40 minutes until the beans are cooked. (Instant pot setting is high pressure for 40 minutes).

3- In the meantime, fry the lardons until cooked, and set aside. Then fry the garlic in the bacon fat and set aside.

4 - When the beans are cooked, add the garlic and bacon and stir well as you bring to the boil over medium heat. Boil for 5 minutes before serving. Season with salt to taste before serving (here the lardons were quite salty and no salt was needed.)


    Notes

    If you don't have a pressure cooker or an Instant pot dont worry. You can also cook the beans on a regular pan. It will take two hours. There is also the very easy way to do it. Simply buy black beans already cooked on the can and use them insted. The flavour will come good as well!

    This recipe serves five.

    Serve the beans with white rice. Optionally, garnish with farofa (toasted manioc flour) and some hot sauce like Tabasco.

    Or you may want to serve it up as a side dish with some chicken or steak (picanha).


Caipirinha


- 1/2 lime, quartered
- 2 teaspoon white sugar
- 2 1/2 (75ml) fluid Oz Cachaça
- 1 cup crushed ice

In a large rocks glass squeeze and drop in 2 eighths of lime. Add sugar, crush and mix with a spoon. Pour in the cachaca and plenty of ice. Stir well.

1.18.2022

Brazilian carrot cake

Brazilian Carrot Cake, know as Bolo de Cenoura, is one of my favorite desserts and one of the most popular and traditional in Brazil. It is unlike any regular carrot cake you have seen before in Europe or USA, if you have not tried it and is truly a unique carrot dessert. It is rich in flavor and texture and is perfectly coated with a delicious signature chocolate sauce. Here is a simple and easy way to make this traditional Brazilian carrot cake dessert without all the fuss.


Ingredients for Brazilian carrot cake:


For the carrot cake:
1/2 cup vegetable oil
3 carrots grated
4 eggs
2 cups sugar
2 1/2 cups flour
1 tablespoon baking powder
1 teaspoon vanilla
For the Sauce:
1 tablespoon butter
3 tablespoons cocoa powder or chocolate of your choice.
1 cup sugar
4 tablespoons milk
Directions for the Brazilian carrot cake:
1) On a blender beat the carrots, eggs and oil for one minute; add the sugar and continue beating for another minute.
2) Take the mixture out of the blender and place in a big bowl, incorporate the flour.
3) Incorporate the baking powder slowly.
4) Pour into a greased baking mold and bake in the oven at 180C/355F for 40 minutes.
5) Once done, take out of the oven and cover with the chocolate sauce.
For the Sauce:
1) Combine all ingredients in a saucepan, bring to the boil.
2) Once it reaches a syrup like consistency, it is ready.
3) Pour over the cake, serve and enjoy!